15 Layer Cake Mistakes Everyone Makes
We’ve all been there – standing in the kitchen with a lopsided layer cake that looks nothing like the Pinterest masterpiece we envisioned.
I’ll never forget my first attempt at a birthday cake that ended up resembling the Leaning Tower of Pisa!
After years of trial, error, and more than a few cake disasters, I’ve identified the most common layer cake pitfalls that trip up even experienced bakers.
Let’s fix these mistakes together so your next cake will be both beautiful and delicious!
1. Skipping The Room Temperature Rule
Cold ingredients are the sneaky saboteurs of your cake’s texture! I learned this the hard way when my butter refused to cream properly, leaving me with a dense, brick-like cake that could have doubled as a doorstop. Room temperature eggs, butter, and milk incorporate more air when mixed, creating that fluffy, tender crumb we all crave.
When cold ingredients meet, they simply don’t play well together – butter stays in stubborn clumps rather than distributing evenly throughout the batter. My foolproof hack: Set ingredients out at least an hour before baking. In a pinch? Place eggs in warm water for 5 minutes and cut butter into small cubes to speed up the warming process. This simple step makes all the difference between a cake that’s light as air or heavy as concrete.
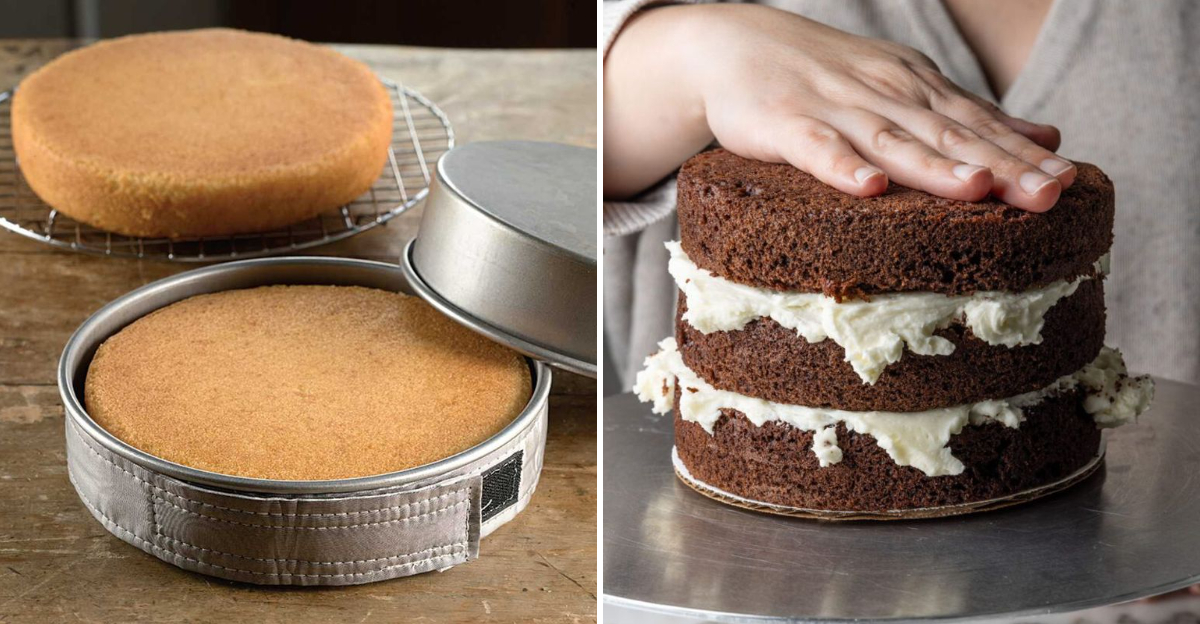
2. Underbaking The Layers
Nothing ruins a gorgeous layer cake faster than the gooey surprise of underbaked layers! My nephew’s birthday party turned memorable (for all the wrong reasons) when my beautiful chocolate cake collapsed into a puddle of batter as soon as I tried assembling it. Perfectly baked cake layers should spring back lightly when touched and show just the slightest resistance when a toothpick is inserted.
That golden, slightly domed top isn’t just for looks—it’s your visual cue that the structure has set properly. The secret weapon in my baking arsenal? An inexpensive oven thermometer. Many ovens run 25-50 degrees off from what the dial shows! Set a timer for 5 minutes less than the recipe suggests, then check every 2 minutes until it’s just right. Your patience will be rewarded with perfectly baked, stackable layers.
3. Forgetting To Level The Cakes
My first wedding cake contribution looked like it had survived an earthquake! The rounded tops created a wobbling tower that eventually slid right off the cake stand during the reception—talk about a memorable entrance. Domed cake tops are completely natural but absolutely treacherous for stacking. Those rounded humps create unstable layers that shift, crack, and ultimately lead to the dreaded cake avalanche.
Plus, those uneven layers mean inconsistent cake-to-frosting ratios in each slice. Grab a long serrated knife or an inexpensive cake leveler (under $10 at craft stores) and trim those domes flat. Don’t toss those scraps—they’re the baker’s reward! I nibble them while frosting or save them for cake pops. This simple step ensures your cake stands tall and proud without taking a nosedive onto your dining table.
4. Skipping The Crumb Coat
Black specks in white frosting? Been there! My first attempt at a red velvet cake looked like it had chicken pox, with red crumbs dotting the pristine white frosting. Mortifying when serving to my future in-laws! The crumb coat isn’t some fancy, optional step—it’s your frosting’s bodyguard. This thin layer of frosting seals in those loose crumbs before you apply the final coat.
Without it, you’ll be fighting a losing battle against rogue crumbs that seem determined to ruin your cake’s appearance. Apply a thin layer of frosting over the entire cake, then chill it for 20-30 minutes until it feels firm to the touch. This creates the perfect canvas for your final layer of frosting. My grandmother called this “priming the canvas,” and she was spot-on—artists and bakers both know good preparation leads to beautiful results!
5. Frosting Cold Cakes Straight From The Fridge
The kitchen clock was ticking before my daughter’s birthday party when I made the rookie mistake of frosting a cold cake. The buttercream hardened instantly, tearing my cake to shreds and leaving me in tears holding cake fragments! Cold cakes and room-temperature frosting are mortal enemies. When you spread soft frosting on a chilled cake, it stiffens on contact, refusing to spread smoothly. Instead of gliding across the surface, your spatula drags, pulling up chunks of cake in its wake.
My time-saving trick? If you’ve refrigerated your layers, let them sit at room temperature for 20-30 minutes before frosting. The cake should feel cool but not cold to the touch. For emergencies, I keep a separate batch of slightly softer frosting just for the crumb coat. This temperature harmony creates that swoon-worthy smooth finish that’ll have everyone asking for your secret!
6. Overmixing The Batter
My quest for perfectly smooth batter once produced a cake with the texture of rubber! I’d blended it into oblivion, determined to eliminate every tiny lump, not realizing I was actually ruining my cake’s texture with every additional spin of the mixer. Overmixing activates the gluten in flour, creating tough, dense cakes with tunnels and air holes instead of that tender, melt-in-your-mouth texture we crave. It’s like overworking bread dough when what you want is a delicate pastry.
Those tiny lumps? They’re actually your friends! Mix just until ingredients are incorporated—you should still see tiny streaks of flour when you stop. Then switch to a rubber spatula for the final few folds. I count “one-one-thousand, two-one-thousand” while mixing to prevent my enthusiastic nature from taking over. Your cake will thank you with a soft, tender crumb that’s worth the restraint.
7. Creating Uneven Layer Thicknesses
Eyeballing batter distribution turned my son’s birthday cake into a funhouse mirror reflection—one layer paper-thin, another thick as a mattress! The resulting cake looked like it had serious posture problems. Uneven layers don’t just look unprofessional; they bake at different rates, leaving some layers overdone while others remain underbaked. Plus, that beautiful, even stripe pattern when you cut into a slice? Impossible with mismatched layers.
Kitchen scales aren’t just for bread bakers! Weigh your mixing bowl before and after adding batter, then divide by the number of pans. For my foolproof method without scales, I use a large cookie scoop or measuring cup to count equal scoops into each pan. Then give pans a gentle tap on the counter to settle the batter before baking. Your cake will bake evenly, stack beautifully, and slice like a dream—professional bakery vibes from your home kitchen!
8. Applying Frosting Too Thin
My grandmother always said, “No one ever complained about too much frosting,” wisdom I ignored when making my first anniversary cake. I stretched my buttercream so thin you could practically see through it, leaving a sad, patchy coating that revealed the cake beneath. Skimpy frosting isn’t just a taste disappointment—it fails at its fundamental job of sealing in moisture. Without adequate coverage, your cake dries out faster than laundry in July.
Plus, thin frosting makes every bump and imperfection glaringly obvious. Make about 1.5 times the frosting you think you’ll need. Apply it generously, especially between layers where it provides crucial moisture and flavor. My rule of thumb: ¼-inch thickness between layers and on top, with slightly thinner sides. When in doubt, prepare extra frosting—leftover buttercream freezes beautifully for up to three months, ready for your next baking adventure or late-night spoon-licking session!
9. Neglecting To Use Cake Strips
Before discovering cake strips, my layers always looked like volcanoes—dramatically domed in the center and cracked on top. I’d waste precious cake by cutting off those humps, turning potential cake height into disappointing scraps. Those dramatic domes happen because the cake’s edges cook faster than its center. As the outside sets quickly from direct pan contact, the center continues rising until it cracks through the top like a mini eruption.
Not only does this create more leveling work, but it also results in layers with drier edges. Wet cake strips (either store-bought or DIY from damp towels and safety pins) insulate your pan’s edges, allowing the cake to bake more evenly from edge to center. My cakes now rise with almost perfectly flat tops, minimal cracking, and consistently moist texture throughout. This $10 investment saves cake, time, and frustration—easily my most valuable baking hack for professional-looking results!
10. Rushing The Cooling Process
Impatience once led me to assemble a still-warm cake for my sister’s baby shower. By the time we sang “Congratulations,” my masterpiece had transformed into a melting, sliding tower of cake layers playing slip-and-slide with the frosting! Warm cakes are structural disasters waiting to happen. The residual heat softens frosting into an unstable goo that can’t support additional layers. Even worse, trapped steam condenses back into the cake, creating soggy patches that collapse under weight.
Each layer needs to cool completely on a wire rack until it reaches room temperature throughout—at least 1-2 hours depending on thickness. For faster results without compromising quality, I place layers (once they’re slightly cooled) in the freezer for 20-30 minutes on a flat baking sheet. The cake should feel cool to the touch but not frozen solid. This patience pays off with stable, stackable layers that hold their shape and your decorative vision intact.
11. Using The Wrong Knife For Slicing
My beautiful anniversary cake became a crime scene when I tried cutting it with a regular dinner knife! Frosting smeared, layers squished, and what should have been elegant slices looked like they’d been attacked by a toddler. The wrong cutting tool transforms your masterpiece into a messy pile faster than you can say “cake catastrophe.” Dull knives drag through layers, creating friction that pulls frosting and squashes delicate crumb structure. Regular serrated knives can be too aggressive, sawing rather than slicing cleanly.
A long, thin knife with a serrated edge is your cake’s best friend. I run mine under hot water and wipe clean between each slice for bakery-worthy results. For even cleaner cuts, chill the assembled cake for 20 minutes before serving—this firms up the frosting just enough to withstand the knife’s pressure without smearing. Your guests will appreciate picture-perfect slices that showcase all your hard work in those beautiful, distinct layers!
12. Stacking On An Uneven Surface
My kitchen counter has a slight tilt that turned my niece’s birthday cake into an architectural marvel—the Leaning Tower of Birthday! What looked level during assembly revealed its true nature once I moved it to the party table, where it slowly shifted like a cake having an existential crisis. Even surfaces that appear level to the naked eye may have subtle slopes that become cake catastrophes once gravity takes hold. The weight of multiple layers amplifies any imbalance, creating internal stress that leads to the dreaded slide-and-collapse scenario.
Before assembling, I place a small level (yes, the tool from your toolbox!) on my cake board to check for perfect horizontal alignment. If you don’t have a level, use your phone—many have built-in level apps! For transport, I freeze the assembled cake for 30 minutes to stabilize it, then use non-slip mats under the cake board. These simple checks prevent the heartbreak of watching your masterpiece perform a slow-motion collapse before the candles are even lit!
13. Overdecorating With Heavy Toppings
My ambitious forest-themed cake for a woodland baby shower taught me a harsh lesson about gravity! I loaded the top with chocolate trees, meringue mushrooms, and candy rocks until the weight caused an avalanche of frosting and decorations sliding dramatically onto the gift table. Heavy decorations on soft frosting create a ticking time bomb. The weight gradually sinks into the frosting, especially in warm rooms, leading to decorations that migrate, tilt, or tumble completely. What starts as an Instagram-worthy design can quickly become a cautionary tale.
For heavier decorations, I create “anchors” by inserting toothpicks or skewers into the cake first. Chocolate pieces get a flat base by melting the bottom slightly on a warm plate. Most importantly, I’ve learned to embrace the “less is more” philosophy—strategic placement of fewer, lighter elements often creates more elegant results than overcrowded designs. Your cake’s structural integrity will thank you, and so will your stress levels!
14. Improper Storage Methods
After spending hours creating a magnificent birthday cake, I once stored it in the refrigerator uncovered overnight. The next day, my masterpiece had absorbed every odor from leftover garlic chicken to blue cheese dressing—a flavor profile no one requested! Cakes are surprisingly like sponges, eagerly soaking up refrigerator smells and drying out when exposed to air. Refrigeration without proper covering leads to dry, stale texture and off-flavors that no amount of frosting can disguise.
Room temperature storage without protection invites dust and curious household pets. Always store finished cakes in cake keepers or loosely tented with plastic wrap that doesn’t touch the frosting. For refrigerated cakes, I place mine in a cardboard box first, then cover the box—double protection against odors and humidity changes! Remember to bring refrigerated cakes to room temperature before serving (about 30 minutes) to revive flavors and soften the frosting to its creamy best.
15. Forgetting The Cake Tester Step
The elegant anniversary cake I made looked perfect until we cut into it, revealing a gooey, undercooked center that sent guests discreetly depositing slices into napkins! I’d relied solely on the timer without verifying doneness—a rookie mistake that haunts me still. Baking times in recipes are estimates, not guarantees. Oven temperatures vary wildly (sometimes by 50 degrees from what the dial shows!), and factors like pan material, batter temperature, and even humidity affect baking times. Without testing, you’re essentially baking blindfolded.
I now keep wooden skewers, toothpicks, and a thin paring knife dedicated to cake testing. Insert your tester in the center—it should come out with a few moist crumbs, but no wet batter. For chocolate cakes that can be harder to judge visually, I gently press the center—it should spring back rather than leave an indentation. This simple step takes seconds but saves cakes from the disappointment of gummy centers or dry overbaked edges.