17 Must-Know Tips Before You Make Another Cheesecake
Cheesecake is the dessert everyone loves but few dare to master. One tiny misstep and your silky dream can turn into a cracked, soggy, or overly dense disaster.
Before you roll up your sleeves for another round of mixing and baking, there are a handful of game-changing tips that can turn your cheesecake from “meh” to magnificent.
Get ready to unlock the secrets that make every slice a smooth, creamy celebration worth every calorie.
1. Room Temperature Ingredients Are Non-Negotiable
Cold cream cheese is the silent assassin of smooth cheesecakes. When ingredients aren’t at room temperature, you’ll end up with a lumpy mess that no amount of mixing can save.
Pull your cream cheese, eggs, and sour cream out of the fridge at least two hours before baking.
This simple step ensures everything blends together like a dream, creating that signature silky texture we all crave.
2. The Gentle Touch: No Overmixing Allowed
Beating your cheesecake batter like it owes you money? Big mistake! Overmixing incorporates too much air, leading to cracks and a fluffy texture instead of that dense, creamy goodness.
Mix just until ingredients are combined, using a low speed on your mixer. Think of it as gently coaxing ingredients together rather than forcing them.
Your patience will be rewarded with that perfect New York-style density.
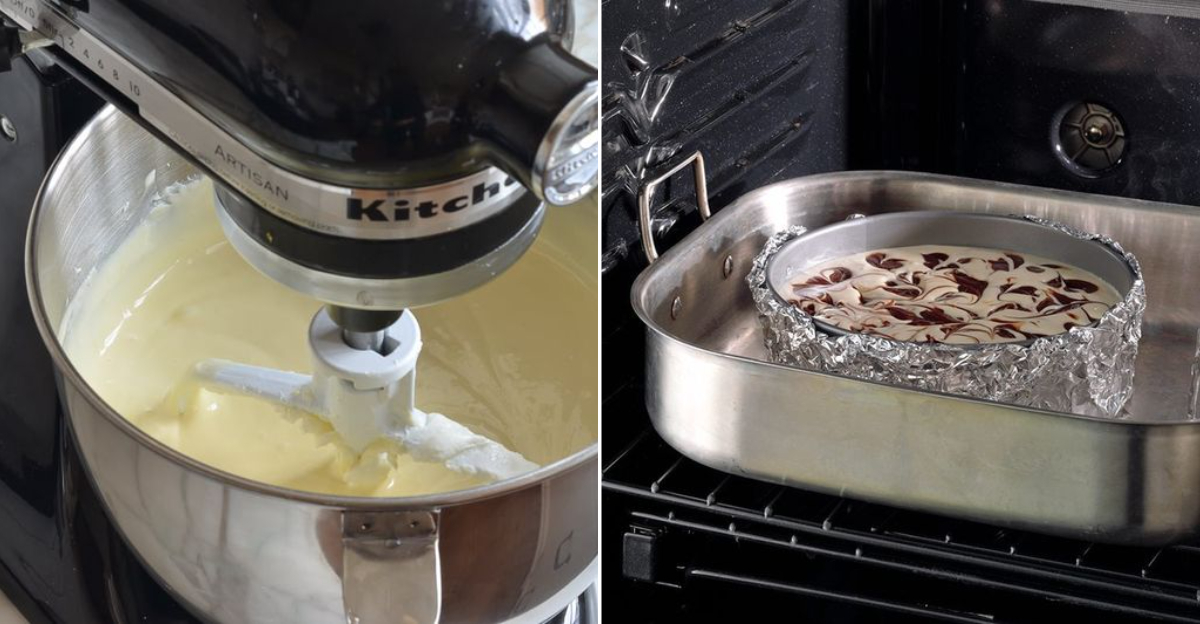
3. Water Baths: Your Cheesecake’s Best Friend
Forget fancy equipment—a water bath is the secret weapon for professional results. This simple technique creates a humid environment that prevents cracking and ensures even baking.
Wrap your springform pan in foil (double layer to prevent leaks), then place it in a larger pan filled with hot water halfway up the sides.
The gentle, consistent heat works magic, giving you that coveted smooth top and creamy texture throughout.
4. Parchment Paper: The Ultimate Insurance Policy
Ever had that heartbreaking moment when half your cheesecake sticks to the pan? Parchment paper is your foolproof solution! Cut a circle for the bottom and strips for the sides of your springform pan.
This creates a non-stick barrier that makes removal effortless. The best part? You’ll get picture-perfect sides without a struggle, making your cheesecake look as professional as it tastes.
5. Give That Crust Some Solo Time
A soggy bottom is the nemesis of good cheesecakes. Pre-baking your graham cracker crust for about 10 minutes creates a toasty, crisp foundation that holds up beautifully against the creamy filling.
Let it cool slightly before adding your batter. This extra step creates a delightful textural contrast between the crunchy base and silky filling.
Trust me, this small effort makes a world of difference in the final result.
6. Patience Pays Off: The Chilling Truth
Fresh-from-the-oven cheesecake might tempt you, but resist! Proper chilling is what transforms good cheesecake into great cheesecake.
Allow your creation to cool completely at room temperature before refrigerating. Then give it at least 4 hours (preferably overnight) in the fridge.
This resting period allows flavors to meld and the texture to set perfectly. Your taste buds will thank you for this exercise in delayed gratification.
7. Keep That Oven Door Shut!
Curiosity destroyed the cheesecake! Opening your oven door during baking causes temperature fluctuations that lead to cracking and sinking.
If you absolutely must check progress, do it through the oven window with the light on. Your cheesecake needs consistent heat to set properly.
Remember, what happens in the oven stays in the oven—at least until the timer beeps!
8. Bubble Trouble? Give It A Tap
Those pesky air bubbles can ruin the smooth surface of your masterpiece. The fix is surprisingly simple—just tap! After pouring your batter into the pan, gently lift and drop the pan onto the counter a few times.
Watch as the air bubbles rise to the surface and pop. For stubborn bubbles, run a toothpick through the batter. This quick step ensures your cheesecake has that flawless, professional appearance.
9. Full-Fat Is Your Friend
Trying to lighten up your cheesecake with low-fat cream cheese? That’s a recipe for disappointment! The fat content is crucial for that luxurious mouthfeel we all crave.
Full-fat cream cheese creates the perfect texture and flavor. If you’re watching calories, simply enjoy a smaller slice.
After all, a properly made cheesecake with the right ingredients is worth every delicious bite. Some things just shouldn’t be compromised!
10. The Slow Cool-Down Method
Shocking your cheesecake with sudden temperature changes is asking for trouble. Gradual cooling prevents the dreaded crack down the middle.
When baking is complete, turn off the oven but leave the door closed for about 30 minutes. Then crack the door open for another 30 minutes.
Finally, move it to room temperature. This gentle transition helps your cheesecake maintain its structural integrity and smooth top.
11. Springform Pans: Worth The Investment
Attempting cheesecake in a regular cake pan is like trying to perform surgery with a butter knife—technically possible but unnecessarily difficult.
A quality springform pan with a removable ring makes unmolding effortless. Look for one with a tight seal to prevent water bath leaks.
The sides release cleanly, preserving your cheesecake’s beautiful edges. It’s the single most important tool in your cheesecake arsenal.
12. Low and Slow Wins the Race
Rushing a cheesecake is like trying to hurry through a first date—it never ends well! Patience is the secret ingredient that can’t be measured. Plan ahead and give yourself plenty of time.
From bringing ingredients to room temperature to the final chill, great cheesecake can take up to 24 hours from start to finish.
The extended timeline allows flavors to develop fully and textures to set perfectly.
13. The Stabilizer Secret: Cornstarch or Flour
A tablespoon of cornstarch or flour might seem insignificant, but it’s your insurance policy against disaster. These humble ingredients stabilize the eggs in your batter, preventing overcoagulation.
The result? A cheesecake that holds together beautifully when sliced. This trick is especially helpful for beginners still mastering the perfect baking time.
Just a small amount blended with your sugar creates noticeably more consistent results.
14. Mixer Speed Matters More Than You Think
Cranking your mixer to high speed isn’t just unnecessary—it’s actively harmful to your cheesecake! High speeds incorporate too much air, leading to souffle-like rising and subsequent falling.
Keep your mixer on low or medium-low throughout the process. This gentle approach maintains the dense, creamy texture that defines classic cheesecake.
Remember, we’re making cheesecake, not whipping up a meringue!
15. The Post-Bake Knife Trick
Even perfectly baked cheesecakes can crack as they cool and contract. The professional solution? Run a thin knife around the edge immediately after baking.
This simple move detaches the cake from the pan sides, allowing it to shrink naturally without tension. Think of it as giving your cheesecake breathing room.
Just one quick circuit around the perimeter prevents those frustrating cracks that appear during cooling.
16. Temperature Is Everything
Blast-furnace heat is cheesecake’s worst enemy! Professional bakers know that low temperatures (around 325°F) are essential for even cooking without browning.
Lower heat allows the center to cook through before the outside becomes overdone.
The gentle approach means your cheesecake will have that perfect pale golden color rather than an unappetizing brown top. Remember, we’re baking, not searing a steak!
17. The Overnight Rule: Never Rush The Final Chill
Four hours might seem like enough refrigeration time, but true cheesecake perfection requires overnight chilling. This isn’t just about temperature—it’s about flavor development!
During this extended cold rest, the tangy notes mellow and the sweetness becomes more complex.
The texture also firms to the perfect consistency for clean slicing. Waiting might be torture, but your first bite will prove it was absolutely worth it.