9 Challenging Dishes To Cook And How To Get Them Right
Cooking is both an art and a science, with some dishes requiring precision, patience, and a bit of culinary courage.
I’ve spent years battling temperamental soufflés and wrestling with finicky pastry dough in my kitchen.
Whether you’re looking to impress dinner guests or simply challenge yourself, mastering these tricky recipes can transform you from an everyday cook into a confident chef.
Ready to tackle some kitchen mountains?
Let’s explore nine notoriously difficult dishes and the secrets to conquering them!
1. Beef Wellington: The Steakhouse Showstopper
My first attempt at Beef Wellington ended with soggy pastry and overcooked meat – a culinary heartbreak I’ll never forget! The trick to this British classic lies in the temperature control.
Start with high-quality beef tenderloin and sear it quickly to develop flavor while keeping the inside raw. The game-changer? Thoroughly chill your mushroom duxelles and wrapped beef before encasing in pastry. This prevents the pastry from getting soggy from meat juices.
Always use a meat thermometer to nail the perfect doneness. For that golden, flaky crust, brush with egg wash and create small vents for steam to escape. Rest it properly before slicing – those 15 minutes of patience make all the difference between a perfect presentation and a messy disaster!
2. Croissants: Laminated Layers Of Love
Croissants had me throwing flour across the kitchen in frustration before I finally cracked their buttery code! These French pastries demand respect – and precise temperature control.
The secret is maintaining cold butter throughout the lamination process. I keep an ice pack nearby during summer months to prevent the butter from melting into the dough. Count your folds carefully – too many will create dense pastries, too few will lack that signature honeycomb interior.
Proofing is where magic happens. Look for croissants to triple in size and wobble slightly when the baking sheet is gently shaken. A properly proofed croissant should feel light and airy. Bake until deeply golden – pale croissants often hide undercooked centers that collapse when cooled!
3. Baked Alaska: Fire And Ice Dessert
My dinner guests still talk about the flaming dessert incident of 2019 when I first attempted Baked Alaska. This retro showstopper combines frozen ice cream with hot meringue in a culinary magic trick.
The foundation is crucial – use a dense cake that can support the weight of ice cream without becoming soggy. Freeze your ice cream dome rock-solid (overnight minimum) before applying meringue. A kitchen torch creates beautiful browning without melting the ice cream, but if using an oven, work lightning-fast!
Swiss meringue works better than French for this dish because it’s more stable. The egg whites should be at room temperature for maximum volume. For extra insurance against melting disasters, place your assembled dessert (pre-meringue) in the freezer on the serving plate you’ll use for the final presentation!
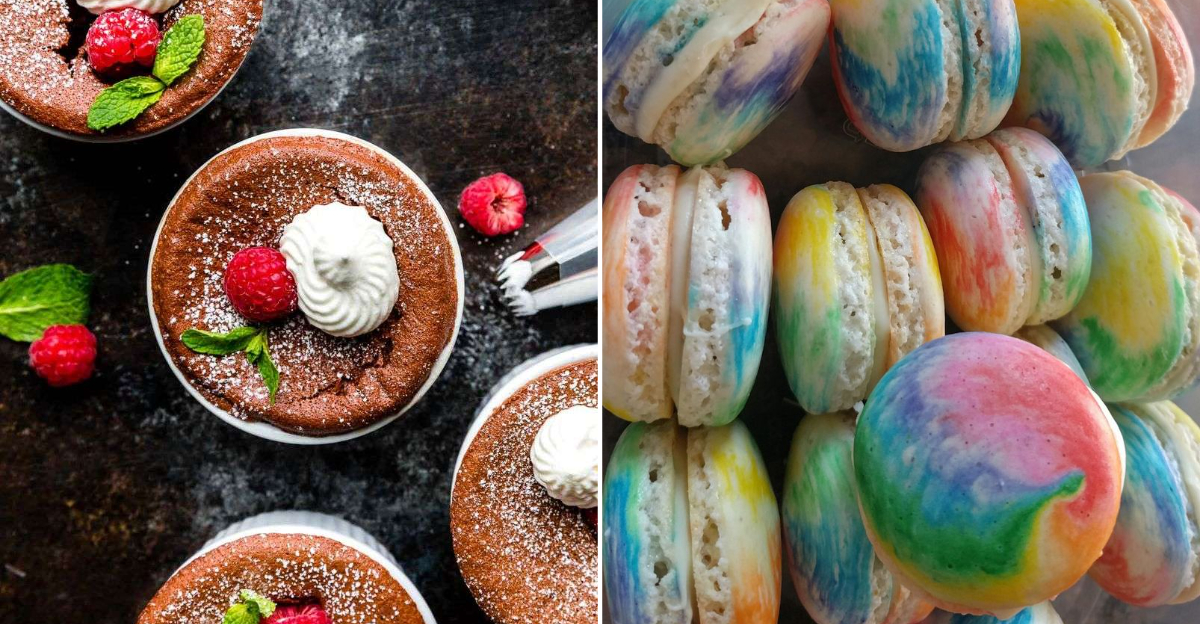
4. Macarons: Temperamental French Cookies
“These colorful cookies can’t be that hard,” I foolishly thought before six failed batches taught me humility. Macarons demand precision, from egg white aging to perfect folding technique.
Weather matters enormously with these fickle treats. Humid days are your enemy – they prevent proper shell formation. I learned to run the air conditioner on baking days! The macaronage (folding) technique requires a delicate touch: too little and your shells crack; too much and you’ll have flat, featureless discs.
Aging egg whites for 24-48 hours creates more stable meringue. Let piped macarons rest until they form a skin before baking – you should be able to gently touch the surface without getting batter on your finger. And always, always use a template under your parchment for consistent sizing!
5. Soufflé: The Notorious Rising Star
The first soufflé I served my in-laws deflated faster than my cooking confidence! These elegant French creations have a reputation for being temperamental, but mastering a few principles makes success achievable.
Room temperature eggs separate more easily, but cold whites whip better. Gentle folding preserves air bubbles – I count no more than 20 strokes. Ramekin preparation is crucial: butter should be applied upward in vertical strokes, creating ridges that help the soufflé climb.
Never, ever open the oven during baking! Even slight temperature changes can cause collapse. Serve immediately – a perfect soufflé waits for no one. For savory versions, adding a stabilizer like a bit of cornstarch to the base helps maintain structure. My chocolate soufflé finally earned my mother-in-law’s approval, making all those failed attempts worthwhile!
6. Risotto: The Meditation Of Stirring
“Just stir rice for 25 minutes? Easy!” I naively thought before discovering risotto’s demanding personality. This northern Italian staple taught me that patience truly is a culinary virtue.
Toasting the arborio rice until translucent creates the foundation for perfect texture – skip this step and you’ll miss that signature al dente bite. The broth must be kept hot throughout cooking; cold liquid shocks the rice and prevents proper starch release. I keep it simmering in a separate pot.
Contrary to popular belief, you don’t need to stir constantly – just frequently enough to release the starch that creates that creamy texture without rice becoming mushy. The finished risotto should flow like lava when plated, not sit in stiff mounds. My secret finish? A knob of cold butter stirred in at the very end creates an irresistible silky finish!
7. Paella: Spain’s Prized Rice Dish
My obsession with achieving authentic socarrat (the crispy bottom layer) once set off my smoke alarm and sent dinner guests running! Traditional paella isn’t stirred like risotto – a concept that challenged all my cooking instincts.
The wide, shallow pan is non-negotiable; it maximizes surface area for that coveted crust. Starting with properly bloomed saffron makes all the difference in both color and flavor. I bloom mine in hot broth for 20 minutes before adding.
Managing heat is critical – begin with high heat to sauté ingredients, then gradually reduce as liquid is added. Listen for the gentle sizzle that signals socarrat formation in the final minutes. Resist the urge to stir! Cover with a kitchen towel after cooking and let rest for 5-10 minutes to allow flavors to meld. When done right, the combination of tender rice, flavorful proteins, and that caramelized bottom creates culinary magic!
8. Coq Au Vin: French Farmhouse Classic
My first Coq au Vin looked more like purple chicken soup than the glossy, rich stew I’d hoped for! This rustic French classic requires patience and proper technique to transform humble ingredients into something extraordinary.
Traditional recipes call for older birds that need long braising, but with today’s younger chickens, I’ve learned to adjust cooking times. Properly browning each piece of chicken creates the foundation of flavor – don’t crowd the pan or you’ll steam instead of sear.
Flambing the cognac isn’t just for show; it adds complex flavor while burning off harsh alcohol notes. The mushrooms should be sautéed separately until golden before adding to the stew. This prevents them from becoming rubbery. For that silky sauce, reduce the cooking liquid after removing the chicken, then mount with butter off the heat. The transformation from simple ingredients to elegant dinner is what makes this dish so rewarding!
9. Brisket: Low And Slow Barbecue Royalty
The first brisket I smoked was tough enough to resole my shoes! This humbling experience taught me that barbecue isn’t cooking – it’s a time-consuming relationship with meat and fire.
Selecting the right cut is crucial – look for good marbling and a thick, even fat cap. Patience during trimming pays dividends in the final product. I spent years perfecting my rub, but discovered the magic lies more in temperature control than seasoning complexity.
The infamous “stall” around 165°F had me panicking until I learned it’s normal – moisture evaporating from the surface creates a cooling effect. Wrapping in butcher paper at this point helps push through while maintaining bark integrity. The brisket is done when a probe slides in like butter, typically around 203°F, but feel matters more than temperature. Proper resting (at least 1-2 hours) is non-negotiable for juicy results!