19 Common Mistakes When Cooking Chicken, How To Avoid Them
Chicken is one of the most versatile meats in our kitchen, but it’s also easy to mess up.
I’ve had my fair share of rubbery, bland, or undercooked poultry disasters before figuring things out.
Whether you’re making a simple weeknight dinner or impressing guests, avoiding these common chicken cooking mistakes will transform your meals from mediocre to magnificent.
1. Bland Bird Syndrome
My first attempts at chicken were so tasteless that my dog actually hesitated before accepting the leftovers! The culprit? Not enough seasoning. Chicken is like that quiet canvas waiting for your flavor artistry.
Salt is your best friend here, but don’t stop there. Pepper, garlic powder, herbs, and spices need to be applied generously—not just on top, but under the skin where possible. Remember that some seasoning will fall off during cooking, so be more heavy-handed than you think necessary.
For maximum flavor penetration, try dry brining by salting your chicken 1-24 hours before cooking and refrigerating it uncovered. This simple step creates juicier meat with seasoning that goes beyond the surface.
2. Fridge-To-Fire Fiasco
Picture this: I once tossed ice-cold chicken breasts straight from the fridge into a hot pan. The result? Charred outsides with disturbingly pink centers—a cooking catastrophe! Cold chicken straight from refrigeration cooks unevenly every time.
Let your chicken rest at room temperature for 15-30 minutes before cooking. This simple step allows the meat to warm slightly, promoting even cooking from edge to center. The physics is straightforward—cold centers take longer to heat up, leaving you with the dreaded overcooked exterior/undercooked interior problem.
For thicker cuts like whole chickens or bone-in breasts, this resting period becomes even more crucial. Just don’t leave chicken out longer than 2 hours for food safety reasons.
3. Pan-Packed Poultry Problems
Guilty as charged! I’ve tried cramming eight chicken thighs into a 10-inch skillet because I was in a hurry. The chicken ended up steaming rather than browning—a sad, pale dinner indeed.
When you overcrowd your cooking vessel, the chicken releases moisture that can’t evaporate quickly enough. Instead of developing that gorgeous golden crust, your chicken stews in its own juices. The pieces essentially steam each other, resulting in soggy skin and missed flavor opportunities.
Cook in batches if necessary, giving each piece breathing room—at least 1-2 inches between pieces. Yes, it takes longer, but your taste buds will thank you for those extra minutes. The crispy, caramelized results are absolutely worth the wait!
4. Leather Meat Mishap
My college roommates still tease me about the chicken breasts I served that could have doubled as shoe soles! Overcooking is perhaps the most common chicken crime—one I’ve certainly committed more than once.
Chicken breast, especially boneless and skinless varieties, goes from perfect to parched in a matter of minutes. The lean meat has very little fat to keep it moist, making it particularly vulnerable to heat. White meat is done at 165°F, but it continues cooking even after you remove it from heat.
Pull your chicken breasts at 160°F and let carryover cooking finish the job while it rests. For dark meat like thighs, aim for 175°F for the perfect texture without turning it into jerky. Your chicken should be firm but still yield easily when pressed.
5. Raw Deal Mistake
The pink chicken incident of 2018 still haunts my dinner party reputation. Nothing ruins a meal faster than cutting into undercooked chicken—it’s not just unappetizing, it’s a serious health risk!
Salmonella and campylobacter are no joke, potentially causing serious illness. The tricky part is that chicken can appear done on the outside while remaining raw near the bone or in thicker sections. Visual cues like color can be misleading, especially with darker meat or when marinades are used.
The only reliable method is checking the internal temperature with a meat thermometer. Chicken must reach 165°F in its thickest part to be safe. If cooking bone-in pieces, make sure the thermometer doesn’t touch the bone, which conducts heat differently and gives false readings.
6. Temperature Guessing Game
For years I played chicken roulette—cutting into meat to check doneness, losing precious juices in the process. Then my sister gifted me a digital meat thermometer, and my chicken game changed overnight!
Without a thermometer, you’re basically flying blind. The “clear juices test” isn’t reliable, and the “touch test” requires experience most home cooks don’t have. A good digital thermometer costs less than a decent takeout meal but transforms your cooking consistency.
Insert the thermometer into the thickest part of the meat without touching bone. For whole chickens, check both the breast (165°F) and the thigh (175°F for better texture). Instant-read digital models give results in seconds, while leave-in probe thermometers can monitor cooking without opening the oven, eliminating guesswork entirely.
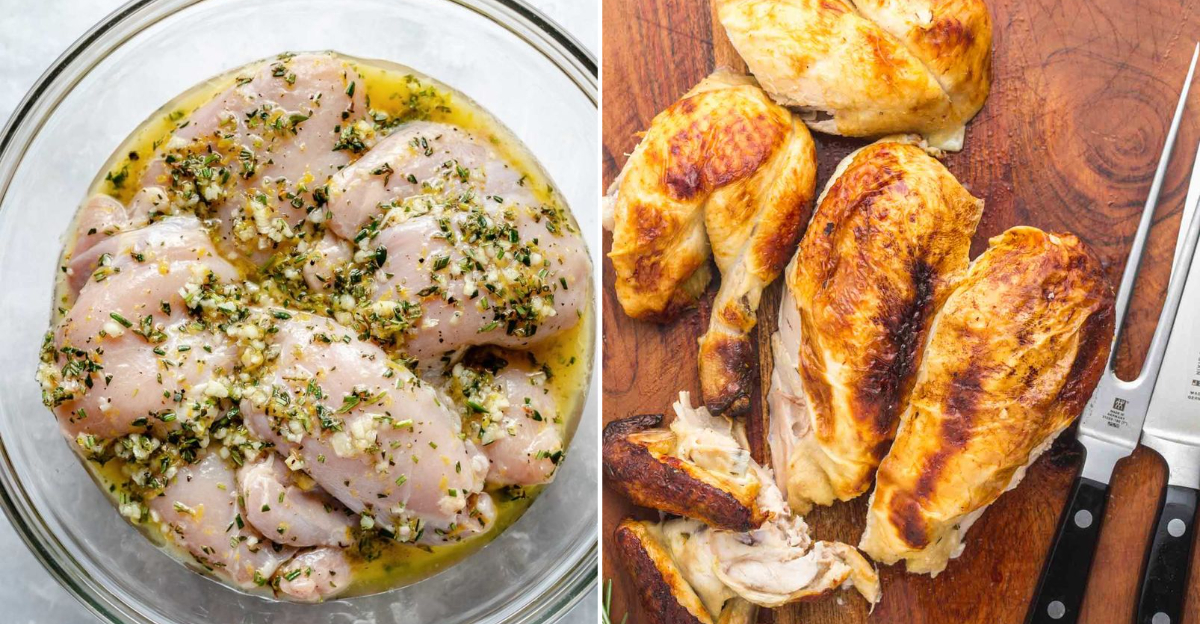
7. Marinade-Free Monotony
My family used to call my chicken “the blank canvas”—and not as a compliment! Skipping the marinade means missing a major flavor opportunity and potential moisture enhancement.
Marinades do double duty: they infuse flavor while also tenderizing the meat through acidic ingredients like lemon juice, vinegar, or yogurt. Even a quick 30-minute bath makes a noticeable difference, though longer marinating (2-24 hours) creates more dramatic results. The acids break down tough proteins, creating more tender bites.
For a super-quick option when you’re short on time, try a dry rub instead. Combine salt, spices, and a touch of sugar, then massage it into the meat 15-30 minutes before cooking. While not as penetrating as a wet marinade, it still creates a flavor-packed crust that elevates your chicken from boring to brilliant.
8. Impatient Carving Syndrome
I once carved a beautiful roast chicken immediately after taking it from the oven. The tablescape looked magazine-worthy until cutting released a flood of juices that turned my carefully arranged platter into chicken soup! Rookie mistake.
When chicken finishes cooking, the intense heat drives moisture toward the center of the meat. Resting allows these juices to redistribute throughout the chicken instead of spilling out when cut. The difference is remarkable—juicier meat and more flavor in every bite.
For boneless breasts or thighs, a 5-minute rest works wonders. Larger cuts like whole chickens benefit from 15-20 minutes of rest, loosely tented with foil to keep warm without trapping steam that would soften crispy skin. Your patience will be rewarded with dramatically improved texture and moisture.
9. Heat Blasting Blunder
My smoke detector used to serve as my cooking timer until I learned about heat management! Cranking the burner to high might seem like a time-saver, but it’s actually a recipe for chicken disaster.
High heat works for searing, creating that delicious golden crust in the first few minutes. However, maintaining that temperature throughout cooking leads to a charred exterior and raw interior. The solution is simple: start high, then go low.
Begin with a hot pan to develop color and crust, then reduce the heat to medium or medium-low to allow the chicken to cook through gently. For bone-in pieces or thicker cuts, finishing in a 350°F oven after searing gives perfect results every time. This two-stage cooking method delivers the best of both worlds—beautiful browning and even cooking without setting off alarms.
10. Soggy Skin Situation
The great chicken skin disappointment of my early cooking days taught me a valuable lesson. Water and crispy chicken skin are mortal enemies—a fact I discovered after wondering why my roasted chicken never crisped up like restaurant versions.
Moisture on the surface of your chicken steams rather than browns, preventing that coveted crispy texture from developing. Take a paper towel and thoroughly pat your chicken dry before seasoning or cooking. This simple step removes surface moisture that would otherwise interfere with browning.
For next-level crispiness, try leaving your seasoned chicken uncovered in the refrigerator for a few hours or overnight. This drying technique, used by professional chefs, removes additional moisture from the skin and results in that crackling texture that makes chicken skin so irresistible. Your patience will be rewarded with photo-worthy results!
11. Flip-Happy Cooking
I used to hover over my cooking chicken like a nervous parent, flipping it every 30 seconds. The result? Chicken that never developed a proper crust and took forever to cook. Breaking this habit transformed my results overnight.
Constantly turning and moving chicken prevents proper browning and caramelization. When chicken touches a hot surface, proteins need time to react with heat and develop flavor. Frequent flipping interrupts this process, resulting in pale, uneven cooking and potentially tearing the delicate meat.
Place your chicken in a preheated pan and resist the urge to move it for at least 4-5 minutes for boneless pieces (longer for bone-in). When properly seared, the chicken will naturally release from the pan without sticking. You’ll know it’s ready to flip when it moves easily with gentle prodding—no prying required.
12. Premature Slicing Mistake
My dinner guests once watched in horror as I sliced into a beautiful chicken breast immediately after cooking, creating a flood of juices that left the meat dry as cardboard. Talk about a humbling culinary moment!
Cutting chicken too soon after cooking is like puncturing a water balloon. The intense heat of cooking drives moisture toward the center of the meat. When you cut too early, these juices spill out onto your cutting board instead of redistributing throughout the meat.
Give boneless chicken pieces at least 5 minutes of rest before slicing. For larger cuts like whole chickens, wait 15-20 minutes. During this time, cover loosely with foil if you’re concerned about temperature loss, but leave an opening for steam to escape so your crispy skin stays crispy. Your patience will be rewarded with dramatically juicier results.
13. Cold Start Problem
The sound of chicken hitting a cold pan still makes me cringe—it reminds me of countless meals ruined by skipping the preheating step. This impatient move creates pale, stuck-on chicken that tears when you try to flip it.
A properly preheated cooking surface is non-negotiable for good results. When chicken meets a hot pan, it immediately begins to sear, creating a flavor-packed crust that naturally releases from the surface when ready to flip. Cold starts lead to sticking, steaming, and sad, torn chicken pieces.
For stovetop cooking, heat your pan for 3-5 minutes over medium-high heat. Test readiness by flicking a few drops of water—they should dance and evaporate immediately. For ovens, a full 15-20 minute preheat is essential, even when your oven claims it’s ready sooner. These extra minutes of patience pay huge dividends in texture and flavor.
14. Skin Strategy Mistakes
My health-conscious phase led me to automatically remove all chicken skin, until I realized I was throwing away both flavor and a natural basting mechanism! The skin decision requires more nuance than most cooks realize.
Chicken skin contains fat that melts during cooking, continually basting the meat underneath and preventing it from drying out. Even if you don’t plan to eat the skin, cooking with it on often results in juicier meat. For crispy skin results, ensure the skin is very dry before cooking and use higher heat methods.
If a recipe specifically calls for skinless chicken (like some stir-fries or quick-cooking dishes), follow that guidance. Otherwise, consider cooking with the skin on for moisture benefits, then removing it before eating if you’re watching fat intake. This compromise gives you the best of both worlds—flavor during cooking without the extra calories.
15. Fat Trimming Faults
I once went on a fat-removal rampage, trimming every speck from my chicken. The resulting dinner was so dry that my partner asked if we could order pizza instead! Balance is key when dealing with chicken fat.
Some fat is necessary for flavor and juiciness, particularly when cooking leaner cuts like chicken breast. However, excessive fat pockets can cause flare-ups when grilling or smoking, create greasy results in some recipes, and prevent proper browning in others.
Trim large, visible fat deposits, especially those hanging loosely from the edges, but leave the thin layers of fat attached to the meat intact. For skin-on chicken, leave the fat layer under the skin—it melts during cooking, basting the meat naturally. The goal isn’t fat elimination but rather fat management for the best cooking results.
16. Storage Safety Slip-Ups
My roommate’s infamous “bottom shelf chicken drip” incident contaminated an entire refrigerator of food—a $200 grocery mistake we never repeated! Proper raw chicken storage is non-negotiable for both safety and flavor.
Raw chicken can harbor bacteria that spreads easily to other foods through direct contact or dripping juices. Always store raw chicken on the lowest shelf of your refrigerator in a container that can catch any potential leaks. Keep it in its original packaging if intact, or transfer to a sealed container or zip-top bag.
Use or freeze chicken within two days of purchase for best quality and safety. When thawing frozen chicken, always do so in the refrigerator (never on the counter), allowing approximately 24 hours for a whole chicken or 4-5 hours per pound. These simple habits prevent cross-contamination and preserve the quality of both your chicken and everything else in your fridge.
17. Marinade Recycling Risks
The great food poisoning disaster of my cousin’s graduation party taught our family never to reuse marinade without boiling it first. That simple mistake sent three people to urgent care with severe symptoms!
Marinades that have touched raw chicken contain potentially harmful bacteria. Using this liquid as a sauce or basting liquid without cooking it first poses a significant health risk. The bacteria from the raw chicken transfers to the marinade, creating a serious food safety concern if consumed uncooked.
Alternatively, you can boil used marinade for at least 2–3 minutes to eliminate harmful bacteria, making it safe to use as a basting liquid or sauce.
18. Cross-Contamination Carelessness
My spotless kitchen reputation took a hit when a friend noticed me using the same cutting board for chicken and salad vegetables without washing between tasks. Her horrified expression taught me more than any food safety course ever could!
Raw chicken can harbor salmonella and other bacteria that cause serious illness. These pathogens easily transfer to other foods, utensils, and surfaces. Always use separate cutting boards for raw chicken and ready-to-eat foods, or thoroughly wash boards with hot, soapy water between uses.
Wash your hands thoroughly for at least 20 seconds with soap after handling raw chicken, and clean all surfaces, utensils, and equipment that touched the raw meat. Sanitize countertops with a solution of 1 tablespoon bleach per gallon of water. These simple habits prevent the invisible spread of bacteria that could otherwise make you and your family sick.
19. Thawing Timing Troubles
The dinner party where I tried to speed-thaw chicken in hot water resulted in partially cooked edges and still-frozen centers—plus concerned looks from my guests who witnessed this food safety mishap! Proper thawing requires planning, not shortcuts.
Improper thawing techniques can create unsafe temperature zones where parts of the chicken warm up enough to encourage bacterial growth, while others remain frozen. The refrigerator method is the most reliable—place frozen chicken on a plate or in a container on the bottom shelf and allow approximately 24 hours for a whole chicken or 4–5 hours per pound for pieces.
In a genuine time crunch, the cold water method is a safe alternative: Seal chicken in a leak-proof bag and submerge in cold tap water, changing the water every 30 minutes. Avoid using warm water, thawing on the countertop, or partially defrosting in the microwave—these methods can lead to uneven thawing and potential food safety concerns due to inconsistent temperatures.